#
Manage Data Library
The Purple Fabric Data Library is designed to serve as a centralized, secure, and organized repository for all essential files. It empowers organizations to streamline information access, enhance collaboration, and compliance across all teams.
#
Key Features
#
Centralized Access
The Purple Fabric Data Library eliminates information silos by consolidating data from various departments and projects into a single, unified platform. This ensures that users can easily locate and retrieve the files they need, when they need them.
#
Document Upload & Storage
Our platform offers a seamless and user-friendly experience for uploading and storing files. Key capabilities include:
Multiple File Type Support: Upload and manage a wide range of file formats, including PDF, PNG, JPEG, TIFF, and DOCX.
Convenient Uploading: Utilize the intuitive drag-and-drop interface or perform bulk uploads to efficiently add multiple files at once.
#
Metadata & Tagging
Enhance the organization and discoverability of your data with our advanced metadata and tagging features. Users can assign critical metadata such as author, creation date, and project name, as well as custom tags, to classify and categorize files for easier searchability.
#
Advanced Search & Filters
Locate specific files with speed and precision using our powerful search functionality. The system allows users to find files based on:
Keywords
Tags
Date Ranges
File Type
Owner
#
Collaboration & Integration
Facilitate seamless teamwork and enhance your existing workflows with our collaboration and integration features.
Shared Access: Enable shared access to files and real-time updates to foster effective team collaboration.
Third-Party Integration: The Purple Fabric Data Library is designed to integrate smoothly with other essential business tools, including Amazon S3 and other API based platforms.
#
Creating a Document Set
This guide will walk you through the process of setting up your first document set.
#
Step 1: Review Document Requirements
Before uploading the required files, check the files with the following accepted formats and storage limitations:
File Integrity: Files must not be password-protected, zipped, or protected against page extractions.
Image Quality: Images and files should have a minimum resolution of 200 DPI. (300 DPI is recommended for optimal quality).
Content: files should not contain watermarks.
#
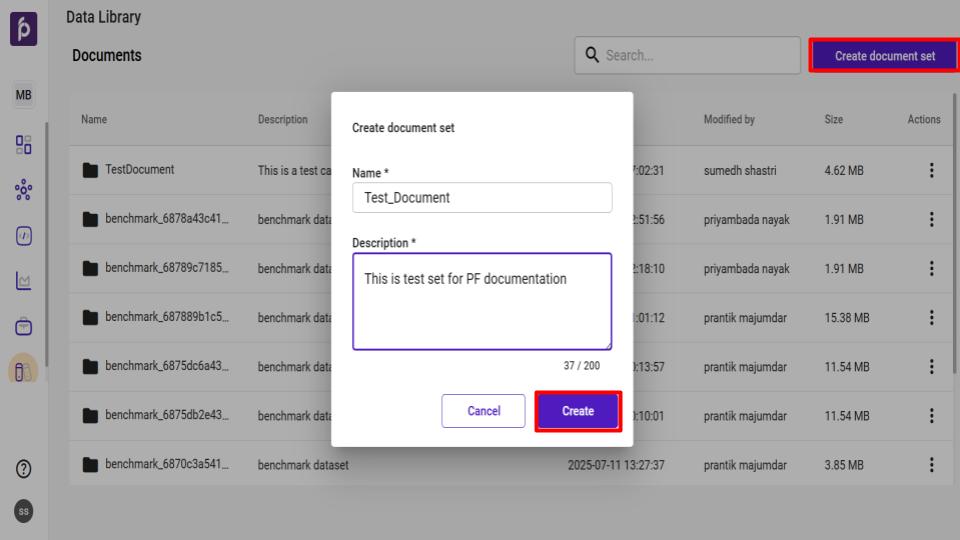
Step 2: Create a New Document Set
Navigate to the Data Library module.
Click the Create document set button.
In the Create document set window that appears, provide a unique Name and a brief Description for your document set.
Click Create to finalize the new document set.
#
Upload Files to the Document Set
You can add files to your set using one of the following methods:
Manual Upload: Upload files directly from your local system.
Amazon S3 Upload: Import files from a configured AWS S3 connector.
Web Crawler Upload: Fetch and store web pages and files from specified websites.
#
Manual Upload Procedure
From the main Data Library page, select the desired Document Set.
On the Document Set page, click Import.
Select the Files option to upload files from your local system.
#
Amazon S3 Upload Procedure
From the main Data Library page, select the desired Document Set.
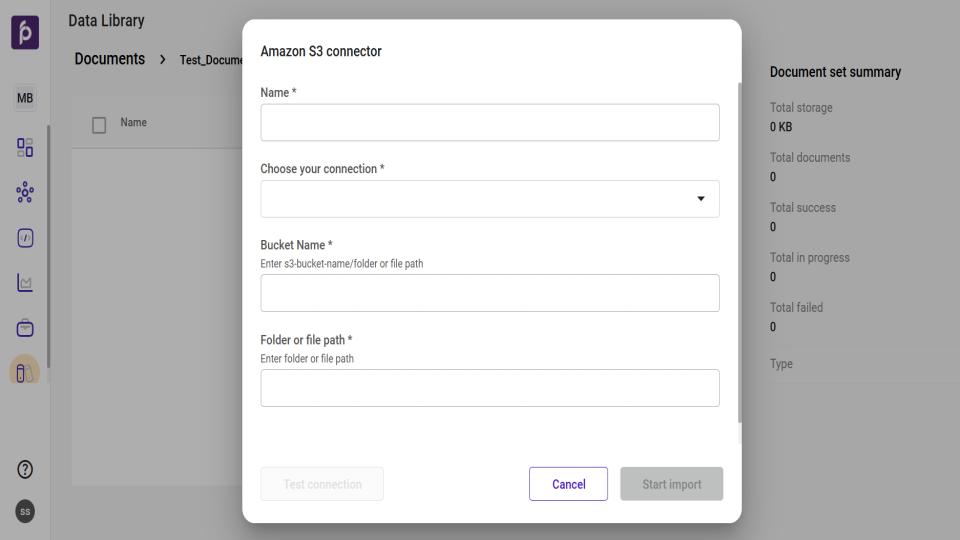
On the Document Set page, click Import and select the Amazon S3 option.
In the Amazon S3 connector window, configure the following:
Select the desired connection from the Choose your connection dropdown.
Enter the specific Bucket Name.
Provide the Folder or File path for the files.
Use the Test connection feature to verify the configuration.
Add any necessary metadata to categorize the imported files.
Click Start import to begin the process.
#
Web Crawler Upload Procedure
From the main Data Library page, select the desired Document Set.
On the Document Set page, click Import and select the Web Crawler option.
In the Name field, provide a unique and descriptive name for your crawler configuration.
Provide Source Content: You can specify the content to be crawled in two ways: by providing direct URLs or by using a search query.
To use direct URLs:
Select the URL tab.
Input the full web address of the site you wish to crawl.
To add more websites, click the + URL button.
To use a search query:
Select the Search tab.
In the Search Query box, enter your query.
Click Run to use the search results as the source for the crawl
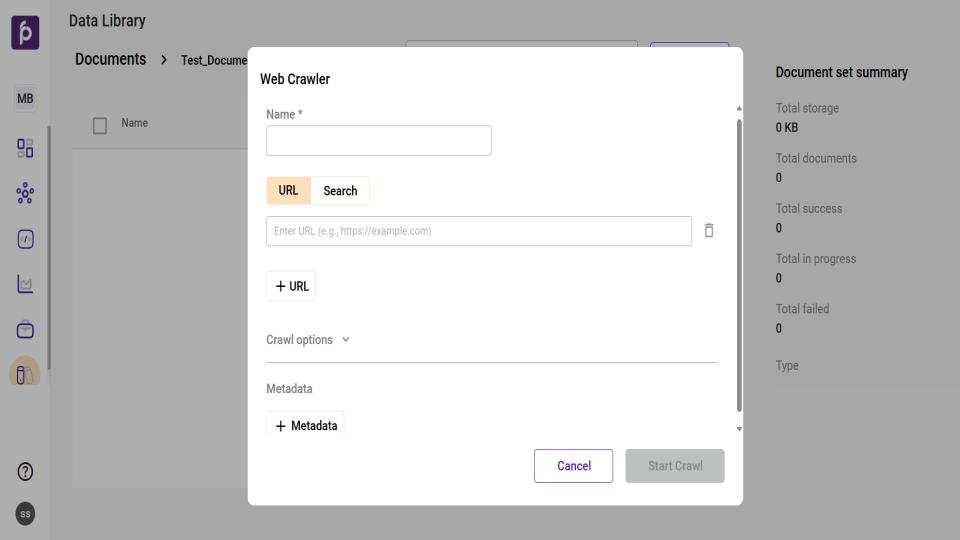
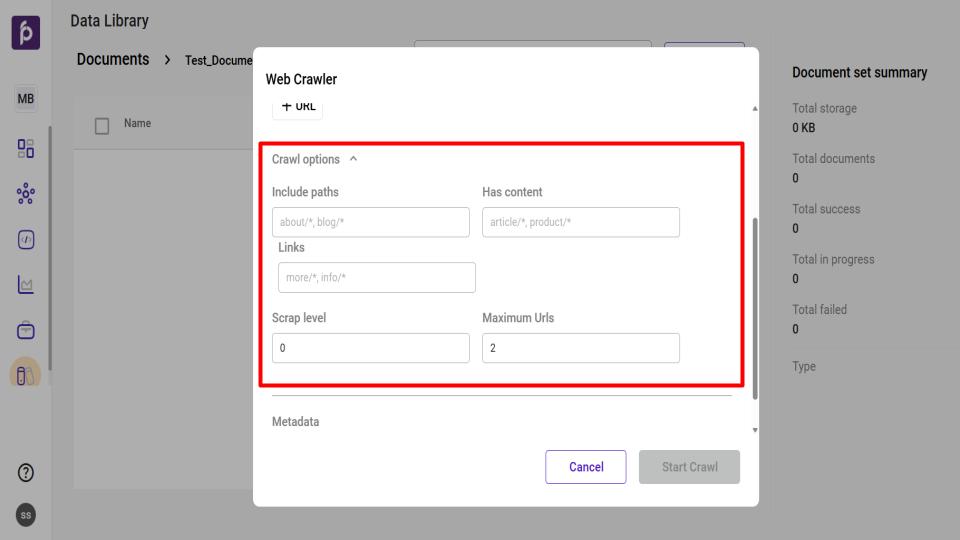
Configure Crawl Options (Optional): Click the Crawl options dropdown to refine the crawler's behavior with the following settings:
Include paths: Specify the only URL paths the crawler is allowed to visit (e.g., about/*).
Has content: Define the URL paths that contain the primary content to be extracted (e.g., article/*).
Links: Enter the URL paths where the crawler should look for more links to follow (e.g., more/*).
Scrap level: Set the crawl depth. A level of 0 crawls only the starting URL, while 1 includes pages linked from the start page, and so on.
Maximum Urls: Set a firm limit on the total number of unique pages the crawler will process during its run.
Add Metadata (Optional): Click the + Metadata button to add custom tags or metadata fields to help in organizing and searching for the crawled content later.
Initiate the Crawl: Once all required information is entered, click the Start Crawl button to begin the process. To discard the configuration, click Cancel.